
How does Control Management work in Impero? 
- You want to automate the execution and administration of controls and improve control effectiveness at the same time? Create your controls! Check out 4 core elements.
- You need tailored reports with filtered content for different stakeholders? Prepare control tags!
- You want to review control documentation on executed and active controls, and take actions on open assignments? Visit the activity list!
➤ You need the role "Control Manager" or "Administrator" to create new programs and controls. Read more here.
Create control program and control
What is a program?
A control program serves to structure controls. It works like a folder that consists of controls from a certain process area, which separates it from other process areas.
In advance of creating controls, you need to create a control program.
Quickstart: Create your first control program and set access rights
- Go to Control Management in the navigation menu.
- Click on "Create new control program". Give your program a unique name and add descriptions.
- Under "Access Management", manage which users can view, edit or administrate the controls within this program.

Preparation Guide: What needs to be decided in advance
Cautious: We strongly recommend to take some time to think about WHO in your organization will have access and work with WHICH control program(s).
Structuring approach
Question 1: Which colleague(s) are responsible for which process area(s)?
Clarify requirement: Restrict view of data between departments and/or process areas?
Question 2: Your organization has multiple subsidiaries or is located in multiple countries?
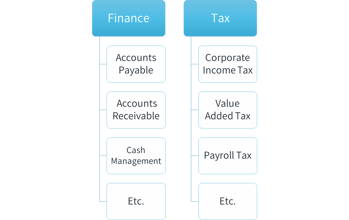
Option A. Structure by process area
Accounts Payable, AR, CM etc.: Each program contains controls for all subsidiaries/countries.

Usage context:
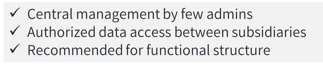
Option B. Structure by subsidiary/country
Each program contains controls for all process areas.
Programs:
Impero A/S, Impero GmbH etc.
OR
Denmark, Germany etc.

Usage context:

Option C. Separated approach
Programs:
AP Impero A/S, AP Impero GmbH, AR Impero A/S, AR Impero GmbH etc.
OR
AP Denmark, AP Germany, AR Denmark, AR Germany etc.
Usage context:

Note: Not sure which approach suits your setting? Reach out to your Customer Success Manager to find the best solution for your setting.
Create your first control
After entering a control program such as "Financial reporting controls", click on the green "add control"-button as shown in the image below.

Alternatively, after entering the Control Management module, you can click on "create new control" in the upper right corner.

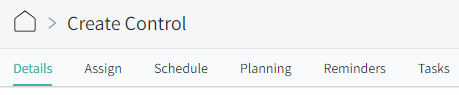
You will then be taken to a new view where you can enter all the information for the control.
A control consists of six major components:
- Details: Give the control a name, descriptions and tags.
- Assign: Assign the control to the responsible(s) and reviewer(s).
- Schedule: Set the control to be either recurring or manual and plan the due date for the control.
- Planning: Set the amount of days each responsible and reviewer has to perform the control.
- Reminders: Set the reminders before and after the due date.
- Tasks: Design your control with different task assignments for the responsible and the reviewer(s).
1. Details

- Name: Insert a name for the control. Use a clear name that indicates the content of the control. Abbreviations and numbers help to identify controls quickly. This field is required.
- Description: Insert a telling description of the control. This will help the responsible and the reviewers know what actions they have to perform. This field is not required, but can be helpful to ensure the control is performed correctly.
- Control program: Specify which program the control should belong to. This field is required.
- Tags: Add relevant tags.
When do I need tags?
Control tags serve to:
A. Categorize controls by control attributes
B. Tailor reports through filtering data by assigned tags
C. Search for controls by tags in Control Management
Note: Once you start with Impero, your tag catalog will be empty. Please see how you can edit your tag catalog here.
2. Assign control to responsible(s) and reviewer(s)
You can assign the control to one or several responsible persons. Each assigned responsible will complete the control assignment separately.
Optionally, you can choose to have a reviewer in terms of a four-eye-principle and also a second reviewer.
A reviewer will review the submitted control and confirm or reject it (send back to responsible). Also, there can be different tasks associated with the review depending on what is assigned in the "Task"-section, which is described here.
Tip: If you send the same control to different departments/entities, you can use assignment tags to mark for which department a control is performed. The tags will serve as a filter in reports, be presented in email notifications and be visible on control forms. Read more about tags here.
Want to assign controls to a team instead of an individual? Learn more here.

Click in the "Add a responsible"-field and enter the user you want to add as responsible. Once a responsible is chosen, a new window opens in which you can add one or two reviewers as well as tags. Click "Save assignment" to finish the setup.
Below the assignee table, you can decide if assignees need to log into Impero to complete the control (or review), and if responsibles are allowed to review their own work.
You have the option to assign different tasks for responsibles, first reviewer and second reviewer. This is explained in detail here.
3. Schedule a control
When setting up a control, you have two scheduling options:
- Automate your regular controls with the recurring option. It will be automatically sent out to the control responsible(s) in a given frequency, such as monthly, quarterly, yearly etc.
- Respond to special events with the manual option. The control will only be sent out once for the specified due date.
To schedule a recurring control, click the "Recurring"-button, and you will get the below view:

- Interval: Enter the interval at which the control should be sent out.
- Starting from: Enter the start date. This is to set a starting point for the recurring event.
- Period: Enter the period for which the control should be done.
- Due date: Enter the date and time where the control should be done and handed in.
You can also customize the schedule, if you e.g. need to send out the control on a different date or not at all in some periods. Tick the small box "customize (monthly) schedule", and a drop down with the options will appear.
To schedule a manual control, click the "Manual"-button, and you will get the below view:

Note: If you wish to use a business days calendar or individualize your company calendar, please reach out to your Customer Success Manager.
4. Plan the control for responsible(s) and reviewer(s)
In the planning section, you determine the amount of days that the control responsible has to perform the control. The responsible will receive the control the set amount of days before the due date, which was specified in the schedule-section.
- Click the "The responsible has"-field, and enter a number of days or use the arrow to scroll up and down.
- Specify the time of the day where the responsible should receive the control in the "Send to the responsible at"-field.

You can also determine how many days or hours the first and the second reviewer have to perform the review. Click the fields, and a dropdown will show.

5. Reminders
Set reminders before and after the due date. You can select as many reminders as you wish by clicking the options in the dropdown or by entering a desired number of days.

6. Tasks: Customize control design for responsibles and reviewers
Create a tailored questionnaire to guide responsibles and reviewers through the control assignment. Collect targeted answers and required documentation to evidence the control execution.
★ Easy-to-understand instructions and standardized templates help to save time for control responsibles, to improve the quality of control results and to better fulfill audit requirements.
Define questions and tasks with the design elements on the right.
Tip on design elements:
Comment field is mostly used to ask for a reason, e.g. if a control step has not been performed.
Checklist is a multiple-choice task where responsibles/reviewers can select several answer options.
Radio-button is a single-choice task, e.g. Have you performed the control? Yes/No.
Dropdown is a single-choice task where responsibles/reviewers can select one answer. This type is especially suitable if you have a large amount of options to choose between.
Attach file asks the responsible to upload document(s).
Heading gives you the option to add headlines to a control or different parts of a control so the end-user perceives a clear organization.
You can design the control so there are different tasks for the responsible, the first reviewer and the second reviewer depending on which actions you want each of them to take. In most cases there would be most of the control tasks for the responsible, and then a few sign off tasks for the reviewers, but it is entirely up to you and your needs how to design it.
You only need to assign tasks for the reviewers if you have assigned any in the "Assign"-section.

You can add a task by clicking on it on the right. Feel free to choose as many tasks as you wish.
- When "required" is marked, the responsible is not able to submit the control, unless the task is performed.
- When "conditions" is marked, this task will only be shown or hidden, depending on the answer of a radio-button or checklist task above.
If you want to remove a task again, click on the task, so that the task settings open on the right side. In the bottom of the task settings, you can click "Delete" and it will be removed from the control.

Can I preview the control from the perspective of the responsible?
Of course! When having a complex design, it is recommended to check the preview. So you can see what the responsible will see and click through the questionnaire.
Click on "Preview" at the end of the page: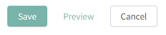 .
.
Complete the control
Click on "Create Control" if the control looks like you wish. You will see the message below.
The control will be sent out to the responsible(s) at the set amount of days before the determined due date.

Your control is now ready!
Tip: It is always recommended to have a double check with your Customer Success Manager to make sure everything is set up as intended.
Administrate your control activities
You have collected controls answers - Ready for review or take further actions?
1. Go to a control program or the Dashboard in the menu.
2. Click on 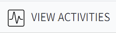 in the upper right corner.
3. Now you see a list of controls that have been sent out. Use the search bar and the time filter to select relevant data.
4. Administrate controls using the automated actions, such as sending reminders to open controls, reassigning controls to other responsibles e.g. due to vacation or resignation. You can export all control results in an Excel file.

Learn more:
How can I add links to a control description or an instruction?
Want to format your text in a control description or an instruction?