B. How can I create a datasheet?
Here you can find a video tutorial and step-by-step instructions for creating a datasheet.
How can I create a datasheet?
- Open the relevant control program. A datasheet is always part of a control program, and it can be used by one or more controls within the control program.
- Use the button “Add datasheet”
 , located at the bottom of the controls, to create a new datasheet.
 - The datasheet is created using an editor with three components: structure editor, response editor and datasheet.
Define the structure of data to be imported
In the structure editor (Figure 2), the datasheet is named. In addition, the structure of the datasheet is defined. You will add the column names of the data that you want to import. The number of columns is not limited.

Figure 2: Example of the structure editor.
1. Start with selecting the column type
Two alternatives can be selected here by clicking on the box on the right or drag-and-drop:
Text
A column, the content of which consists of text, such as names of employees, areas or descriptions for certain key figures.
Number
A column, the content of which is a number, e.g., planned, expected or realized values, account numbers.
2. Set unique key, grouping dimension and mandatory tasks
Required
Means that the respective cell must be filled in, in order to save the datasheet. In other words: a mandatory field in the data table.
Note: If the user does not enter data in the cell, the control cannot be submitted.
Unique key
Means that the content of the cell must not appear twice in the table. Examples are a customer number, account number or other reference numbers and names. They are unique and are not assigned twice. An unique key must be added to create a datasheet.
Grouping
A grouping is used to determine the affiliation of data. Different departments, responsible persons, areas or even individual countries are conceivable as possible groupings. A grouping dimension must be added to create a datasheet.
Tip! Grouping makes it possible to assign parts of a datasheet to a control that are only relevant for a specific group.
Total
With the help of this attribute, a sum can be calculated from the values of a number column. If a datasheet is created with sales from individual quarters, the function can be used to calculate the sum of the total sales.
Live updates
Finally, the structure editor offers the option of deactivating live updates. Normally, a datasheet that has already been sent will change in real-time in the report if changes have been made (see chapter 3).
Note: If this function is not desired, Impero offers the option to deactivate this.
Example for datasheet structure
A Datasheet for bank reconciliation is shown below (Figure 3). Bank account is the unique key, which only exists once in the datasheet. For each bank account, a check should be conducted. The bank accounts are structured by the grouping dimension legal entity code. Each entity responsible receives a selected list of bank accounts that he/she needs to reconcile.
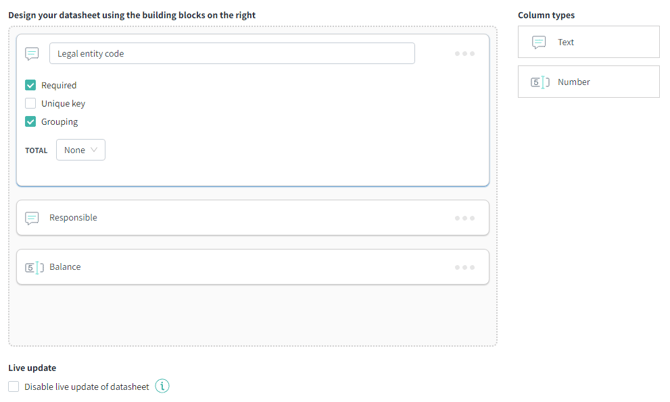
Figure 3: Structure editor
Response editor: Specify questions/tasks related to the data
In the response editor (Figure 4), the response columns for the datasheet are defined. This results in the response fields being filled in by the person performing the control. The same data and column types are available as when creating a control: text, comment field, checklist, option fields, upload field. Columns can be set as mandatory fields (“required”).
Tip! You have the option of calculating the sum of individual columns in the response editor!
In the example already outlined for determining key figures, the column type Number is selected here, and a comment field is created in which the user can optionally write a comment for the reviewer.

Figure 4: Response editor
Datasheet
Finally, the datasheet will be filled with content based on the structure defined in the first step . Figure 5 shows the completed creation of our datasheet example.
Note! If a column has been given the attribute “unique key”, a designation can only be used once.
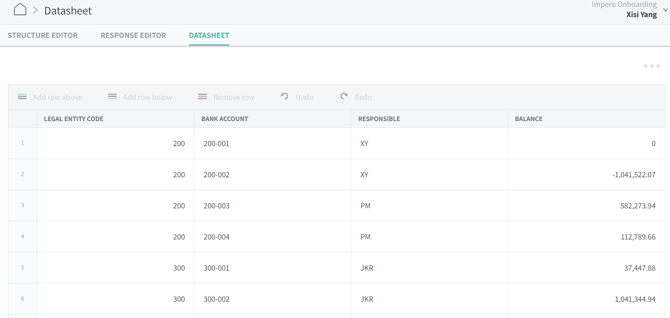
Figure 5: Datasheet with filled content.
How can I insert data from Excel?
In addition to entering the data manually, it is recommendable to import existing data from an Excel table.
- Select the corresponding cells in Excel.
- Copy the cells with the key combination Ctrl + C.
- Paste them in the datasheet with Ctrl + V.
How can I integrate the datasheet into controls?
After creating the datasheet, the datasheet must be sent within a control. For this purpose, a new control is created in the control program to which the datasheet is assigned.
Tip! The datasheet can also be added to an existing control in the control program.
Now you can add the datassheet to every existing or new control in the same control program (where the datasheet has been created). You will use the control designer by clicking on "datasheet" within the "Elements"-section (Figure 6).
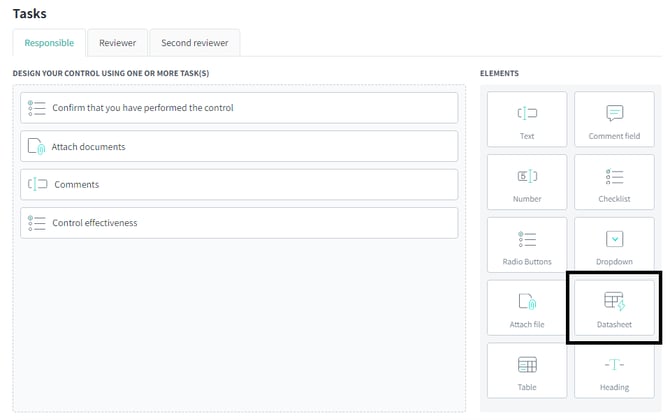
Figure 6: Control designer.
Select a grouping dimension
A grouping dimension must be selected to add the relevant part of the datasheet to a control. Before this, think who should be the responsible person for this control. Select the part of the datasheet using the grouping dimension that she/he needs to work on. The grouping selection can be done when clicking "Select grouping" (Figure 7). Afterwards a pop-up with the selections will appear (Figure 8). The rest of the datasheet will not be shown to her/him. To send different parts of the datasheet to different responsibles, create multiple controls with an assignee each.


Figure 7: Elements editor for Datasheet

Figure 8: Selection of a grouping dimension.
You are all set! Don't forget save the control and preview.
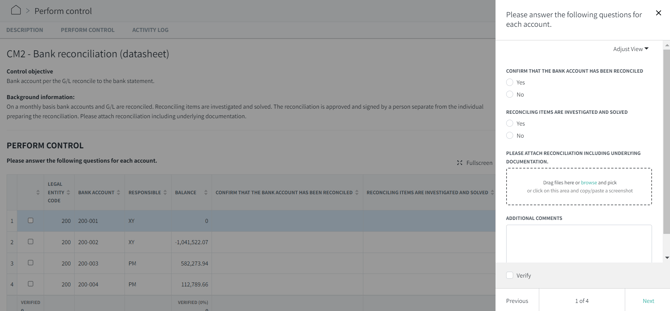
Have a look into the preview. This is the control incorporating the part of the datasheet that refers to entity 200.
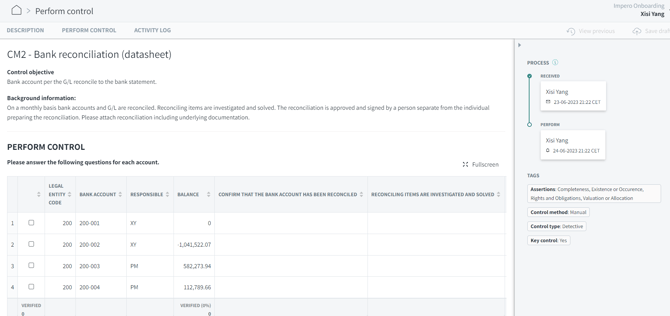
When the control responsible clicks on each of the bank account / data row, a small window will pop up on the right where she can answer pre-defined questions on that specific account. Then, she can click on "Next" to go to the next account.
Learn more:
Do you need to modify existing datasheets? Go to C. How can I modify exisitng datasheets?